The GIGABYTE Z170X-UD5 TH Motherboard Review: An Entry to Thunderbolt 3
by Ian Cutress on February 19, 2016 9:00 AM EST- Posted in
- Motherboards
- Gigabyte
- Thunderbolt
- Skylake
- Z170
- Thunderbolt 3
GIGABYTE Z170X-UD5 TH Board Features
At the heart, the Thunderbolt 3 element here is going to be the most vital. Support for DisplayPort, up to 40 Gbps data rates over an active cable with TB3, and USB 3.1 at 10 Gbps in one port makes for interesting reading. Supporting HDMI 2.0 (HDCP 2.2) via integrated graphics is also worth noting.
| GIGABYTE Z170X-UD5 TH | |
| Warranty Period | 3 Years |
| Product Page | Link |
| Price | Amazon US |
| Size | ATX |
| CPU Interface | LGA1151 |
| Chipset | Intel Z170 |
| Memory Slots (DDR4) | Four DDR4, Supporting 64GB, Dual Channel, Up to 3800 MHz |
| Memory Slots (DDR3L) | None |
| Video Outputs | 2 x Thunderbolt 3 Type-C, supporting DP 1 x HDMI 2.0 via MCDP2800 |
| Network Connectivity | Intel I219-V |
| Onboard Audio | Realtek ALC1150 |
| PCIe Slots for Graphics (from CPU) | 2 x PCIe 3.0 (x16, x8/x8) |
| PCIe Slots for Other (from PCH) | 1 x PCIe 3.0 x4, shared with M.2 slot 3 x PCIe 3.0 x1 |
| Onboard SATA | Six, RAID 0/1/5/10 |
| Onboard SATA Express | Three, RAID |
| Onboard M.2 | 1x PCIe 3.0 x4 or SATA |
| Onboard U.2 | None |
| USB 3.1 | 2 x Type-C Intel Alpine Ridge Controller |
| USB 3.0 | 4 x Rear Panel 4 via headers |
| USB 2.0 | 4 x Rear Panel 4 via headers |
| Power Connectors | 1 x 24-pin ATX 1 x 8-pin CPU 1 x SATA for PCIe |
| Fan Headers | 1 x CPU (4-pin), 1 x CPU_OPT (4-pin) for WC 3 x SYS (4-pin), 1 x SYS (3-pin) |
| IO Panel | 1 x Combination PS/2 4 x USB 2.0 4 x USB 3.0 2 x Thunderbolt 3 Type-C (DisplayPort, USB 3.1, TB3) 1 x Network RJ-45 HDMI Audio Jacks |
| Other Features | Power/Reset Buttons TPM Header Voltage Check Points Front Panel Header Front Audio Header COM Port Header Clear CMOS Jumper Clear CMOS Button Two Digit Debug |
In The Box
We get the following:
Driver Disk
Manual
Quick Use Guide
Rear IO Shield
Two SATA cables
Easy Front Panel Connector
Port Guards
Flexi-SLI cable
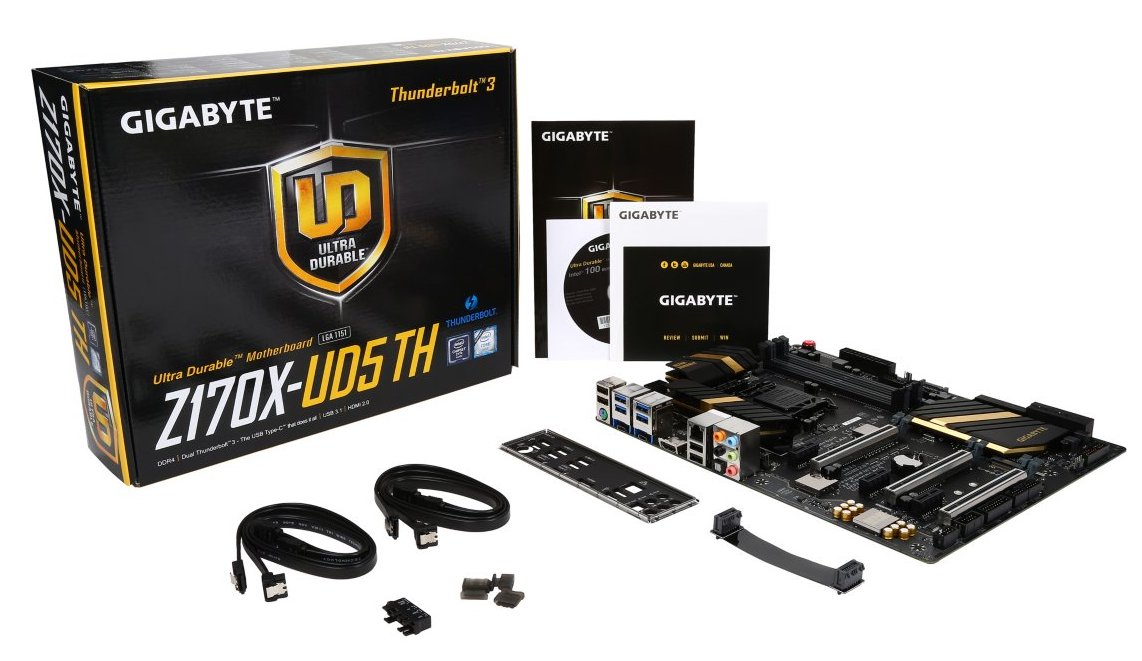
At the ~$200 price point, there are at least two sorts of motherboards – those that are $160-ish base and are boosted up by contents, or $230-ish that are slimmed to meet a price point. The Z170X-UD5 TH is thin on box contents, firstly because it is from the base Ultra Durable line, but also because it may be trying to meet that price point. For example, only two SATA cables is a bit mediocre when the motherboard has six ports, but also at this price we are starting to see USB 3.1 front panel attachments being bundled. You can argue that this is because of the Thunderbolt 3 feature-set, but then I would also request a TB3 or Type-C cable to be included. Unfortunately these can be expensive as well.
Visual Inspection
For the Z170 platform, GIGABYTE moved the majority of the Ultra Durable line, especially above $150, to a black and gold scheme. Other companies have toyed with gold in the past, either a dull gold or something more akin to copper, but the color here is certainly the right one which contrasts with the black in an aesthetically pleasing way. It has been postulated in the past that gold color schemes sell well in various parts of the world, although I can’t confirm this.
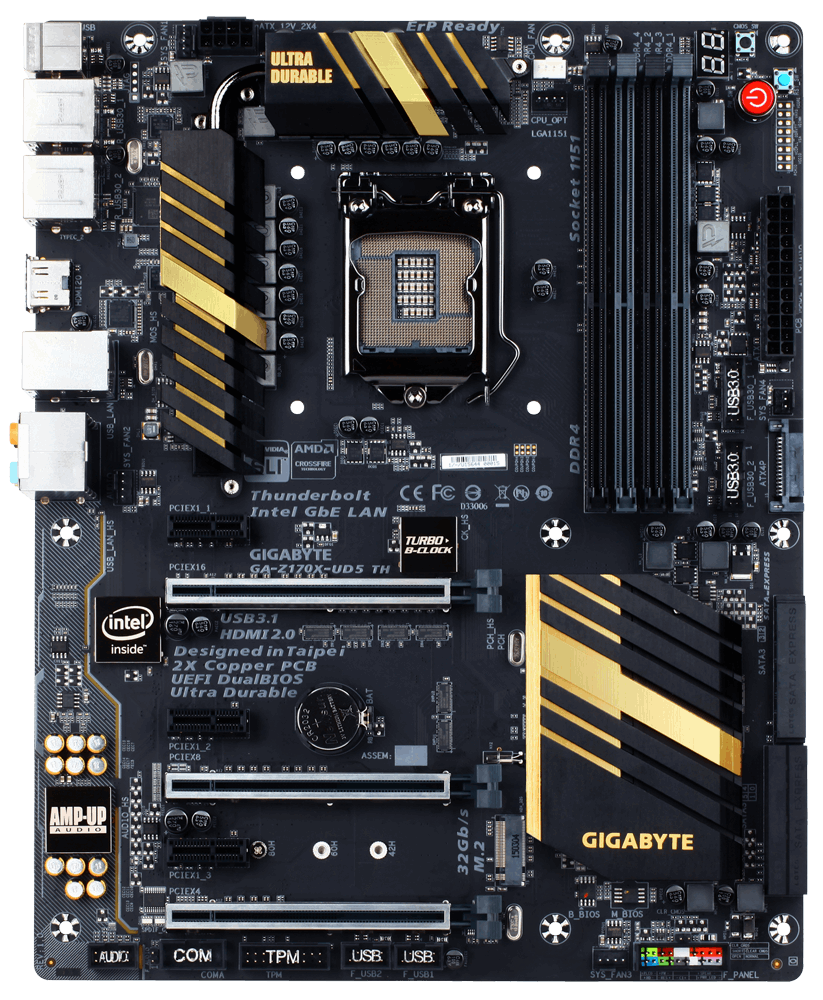
The Z170X-UD5 TH uses International Rectifier IR355x ICs, either 40A or 60A rated, with the high end chokes that are commonly associated with 60A variants (although we’ve seen 40A ICs with 60A chokes before). IR’s parts are often touted as being very efficient, which probably explains the minimal heatsink around the power delivery compared to some of the extended models we see elsewhere. The socket area is very clean, normally an attribute associated with overclocking motherboards, but it is clear that GIGABYTE is using a matte finish on top of the motherboard traces to enhance the aesthetic, along with ditching the Intel specification socket design motifs. The socket area has access to five of the six onboard fan headers – the CPU and WC 4-pin headers are above the socket next to the DRAM slots, a 4-pin SYS header is by the 8-pin power connector, another 4-pin SYS header is by the rear audio jacks and a final 3-pin SYS header is below the 24-pin ATX power connector. The last fan header is a 4-pin SYS header on the bottom of the motherboard next to the front panel header.
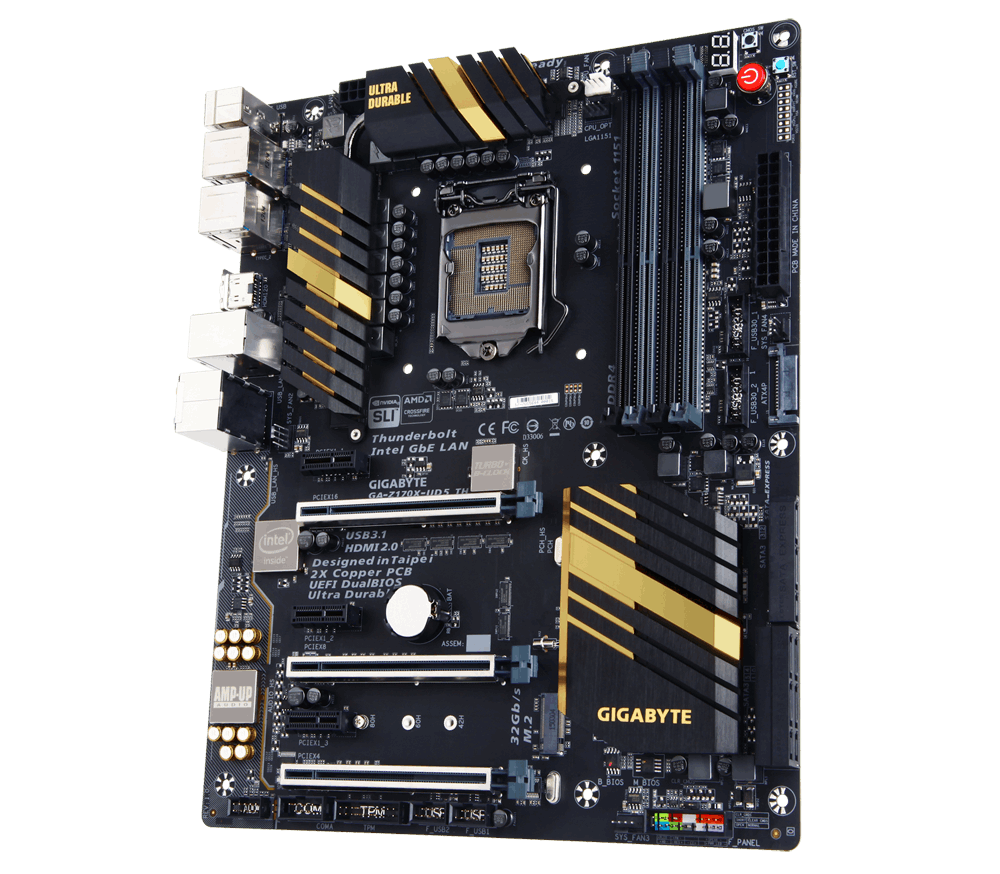
Moving clockwise around the motherboard, we have the four DDR4 memory slots using a single sided latch mechanism. This makes the memory easier to remove, especially in the presence of large graphics cards, but does require extra care when installing the memory to ensure both sides are fully in the slot. To the right of the memory are some of the out-of-case functional items – a power switch, a reset switch, a clear BIOS switch and a two digit debug. I tend to use these extensively in our reviews, and can be useful for debugging issues. Next to this is a series of voltage checkpoints, allowing enthusiasts to directly monitor system voltages when the software is not accurate enough. This typically only applies to extreme overclockers using sub-zero cooling, but it is a simple addition on most motherboard designs. Below this is the 24-pin power connector, a fan header, a SATA power connector to give more power to the PCIe slots, and two USB 3.0 headers.
Beside the large chipset heatsink are six SATA 6 Gbps ports, split into three pairs and supporting SATA Express. While no SATA Express devices exist, some front panel bays are starting to come to market that support USB 3.1 ports, suggesting that there might still be some use for these. With the storage ports is an M.2 slot between the bottom two large PCIe slots, and this M.2 slot supports SATA storage and up to PCIe 3.0 x4 based devices. This slot, in PCIe mode, is switched with the bottom PCIe slot which is PCIe 3.0 x4 from the chipset by default, meaning that only one of the two can be enabled in PCIe mode at one time.
Along the bottom of the motherboard is our front panel header, a fan header, two USB 2.0 headers, a TPM header, a COM header and the front panel audio header. The audio header is inside the audio guard zone, which represents PCB separation of digital and analog signals on the board for audio. This zone lights up using LEDs on the rear of the motherboard, but on the digital side to avoid interfering with the audio signal. The audio section itself encases the Realtek ALC1150 audio codec in an electromagnetic interference shield to reduce outside sources of noise but also uses filter caps to improve signal quality. Beside this zone is an EMI shield over the Intel I219-V network controller, although I doubt if that makes much difference to the performance and is purely for aesthetics.

The main PCIe slots also include a PCIe guard, helping the rigidity of the slots when in the presence of large/heavy graphics cards. Normally this is not a problem when the PC is stationary, but there are some horror stories online of PCIe slots being ripped out by large cards when in transport. This fix is designed to help that and reduce RMA issues. The board also has three PCIe x1 slots for good measure.

The rear panel, by virtue of the two Thunderbolt 3 ports both supporting displays, is filled with USB ports instead of the usual display adaptors. We do get a HDMI 2.0 / HDCP 2.2 enabled port, supported by an LSPCon in the form of the MDCP2800, as well as four USB 3.0 ports and four USB 2.0 ports. To round it all off is a PS/2 combination port, the Intel I219-V network port, and the Realtek ALC1150 audio jacks.
Test Setup
| Test Setup | |
| Processor | Intel Core i7-6700K (ES, Retail Stepping), 91W, $350 4 Cores, 8 Threads, 4.0 GHz (4.2 GHz Turbo) |
| Motherboards | GIGABYTE Z170X-UD5 TH |
| Cooling | Cooler Master Nepton 140XL |
| Power Supply | OCZ 1250W Gold ZX Series Corsair AX1200i Platinum PSU |
| Memory | Corsair DDR4-2133 C15 2x8 GB 1.2V or G.Skill Ripjaws 4 DDR4-2133 C15 2x8 GB 1.2V |
| Memory Settings | JEDEC @ 2133 |
| Video Cards | ASUS GTX 980 Strix 4GB MSI GTX 770 Lightning 2GB (1150/1202 Boost) ASUS R7 240 2GB |
| Hard Drive | Crucial MX200 1TB |
| Optical Drive | LG GH22NS50 |
| Case | Open Test Bed |
| Operating System | Windows 7 64-bit SP1 |
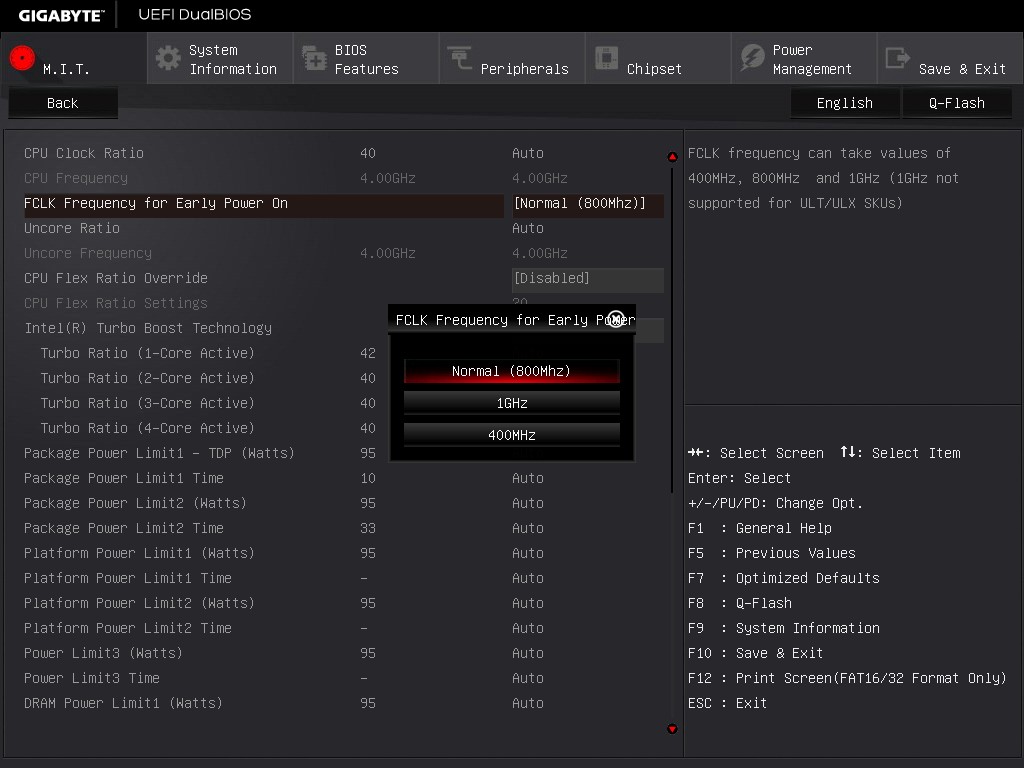
Readers of our motherboard review section will have noted the trend in modern motherboards to implement a form of MultiCore Enhancement / Acceleration / Turbo (read our report here) on their motherboards. This does several things, including better benchmark results at stock settings (not entirely needed if overclocking is an end-user goal) at the expense of heat and temperature. It also gives in essence an automatic overclock which may be against what the user wants. Our testing methodology is ‘out-of-the-box’, with the latest public BIOS installed and XMP enabled, and thus subject to the whims of this feature. It is ultimately up to the motherboard manufacturer to take this risk – and manufacturers taking risks in the setup is something they do on every product (think C-state settings, USB priority, DPC Latency / monitoring priority, overriding memory sub-timings at JEDEC). Processor speed change is part of that risk, and ultimately if no overclocking is planned, some motherboards will affect how fast that shiny new processor goes and can be an important factor in the system build.
For reference, the GIGABYTE Z170X-UD5 TH, on our testing BIOS F4, MCT was enabled by default although seemed to work selectively on some of our tests but not others. Also, the FCLK 10x ratio for PCIe was present in the BIOS tested at the time of testing.
Many thanks to...
We must thank the following companies for kindly providing hardware for our test bed:
Thank you to AMD for providing us with the R9 290X 4GB GPUs.
Thank you to ASUS for providing us with GTX 980 Strix GPUs and the R7 240 DDR3 GPU.
Thank you to ASRock and ASUS for providing us with some IO testing kit.
Thank you to Cooler Master for providing us with Nepton 140XL CLCs.
Thank you to Corsair for providing us with an AX1200i PSU.
Thank you to Crucial for providing us with MX200 SSDs.
Thank you to G.Skill and Corsair for providing us with memory.
Thank you to MSI for providing us with the GTX 770 Lightning GPUs.
Thank you to OCZ for providing us with PSUs.
Thank you to Rosewill for providing us with PSUs and RK-9100 keyboards.


29 Comments
View All Comments
GoMoeJoe - Friday, February 19, 2016 - link
Any Z170 based mobo *that still uses a shared M.2 is unacceptable.Especially the way these clowns did it on this product ...
nehway0912 - Saturday, February 20, 2016 - link
There is a fw update for alpine ridge today. Can you retest the usb 3.1 performance with the lastest fw?jabber - Saturday, February 20, 2016 - link
Wake me up when I can buy a TB3 card for £10 and a TB3 caddy for around the same. No rush.garfieldalvin - Monday, February 22, 2016 - link
Any test perform on the TB3 port for read write data rate, displayport daisy chain with multi monitors?Zak - Friday, February 26, 2016 - link
Thunderbolt will never take off among consumers and enthusiasts due to cost and poor implementation in peripherals that make their price less attractive than USB. I have a TB2 dock and TB2 drive enclosure. USB3 in the dock maxes out at 350MB/s. SSDs mounted in the enclosure max out at 390/360MB/s R/W. All docks and all enclosures have this speed cutoff. And they're very expensive for what you get.olePigeon - Tuesday, April 12, 2016 - link
I don't think you quite understand what Thunderbolt is. Thunderbolt is essentially an external connector to your PCIe BUS. You don't compare it to USB. Sometimes it is USB because that's what you run on it. The advantage to Thunderbolt is that it is whatever you want it to be, including USB.Thunderbolt 3 currently combines either the USB 3 type C connector or DisplayPort 1.2 with PCIe in a single serial signal. This allows you to connect anything you would normally put into your PCIe slot. Many items can be found in the form of an adapter, such as ethernet, USB, SATA, etc.; others can be connected via an external PCIe slot such as video cards, audio cards, and more.
Thunderbolt doesn't compare to USB, it coexists.
WarlordBB - Monday, March 21, 2016 - link
With TB3 coming to several of Gigabytes Gaming boards, is this board worth it when the G1 is about the same price? Granted you get 2 TB3 instead of 1, but still:http://www.gigabyte.com/mb/thunderbolt3/overview
WarlordBB - Monday, March 21, 2016 - link
I meant the G7coldlogic - Tuesday, May 3, 2016 - link
Can anyone point me in the right direction to understand how TB3 passes video through from the GPU?