The ASRock X399 Taichi Motherboard Review: Cost-Effective Threadripper
by E. Fylladitakis on October 26, 2018 8:00 AM EST- Posted in
- Motherboards
- AMD
- ASRock
- ThreadRipper
- X399
Visual Inspection
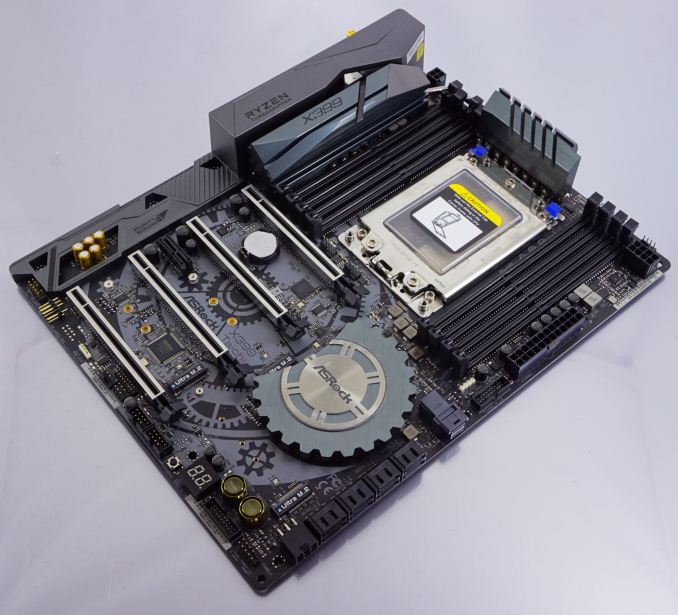
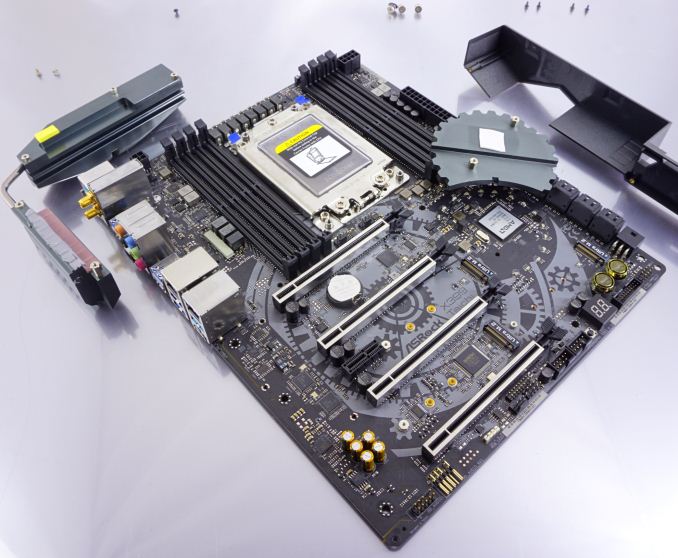
Aesthetically, the ASRock X399 Taichi has little to be envious of more expensive implementations. The design is simple, symmetric, and elegant, with black plastic and gunmetal grey parts creating a subtle visual antithesis. A gear works pattern is dyed on the motherboard's PCB and the gear-shaped chipset heatsink perfectly fits into the theme. There are two additional heatsinks that cool the motherboard's VRM circuitry that are connected via a heatpipe. No active cooling is present. ASRock's design also includes RGB lighting surrounding the gear-like chipset heatsink, with two headers for common 12V RGB strips. There is no support for RGBW or digital RGBW/UV LED products.
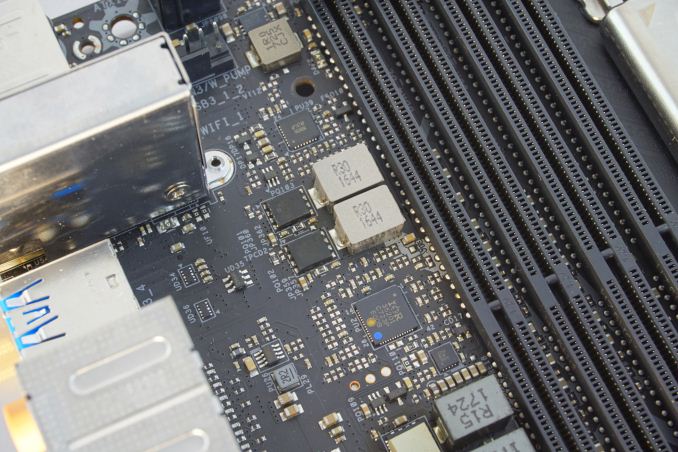
ASRock advertises the X399 Taichi as having an 11-phase design. The motherboard actually has an eight-phase VRM circuit for the CPU, plus an additional three-phase VRM for the SoC. The International Rectifier (Infineon) IR35201 digital controller is handling the eight main phases, with International Rectifier 3555 60A MOSFET drivers and 60A inductors. A second IR35201 controller is present to the left side of the DIMM slots and controls the SoC phases. The power circuitry is practically no different than that of the premium ASRock X399 Professional Gaming and is better, in terms of current capacity, than that of the significantly more expensive GIGABYTE X399 Designare EX.
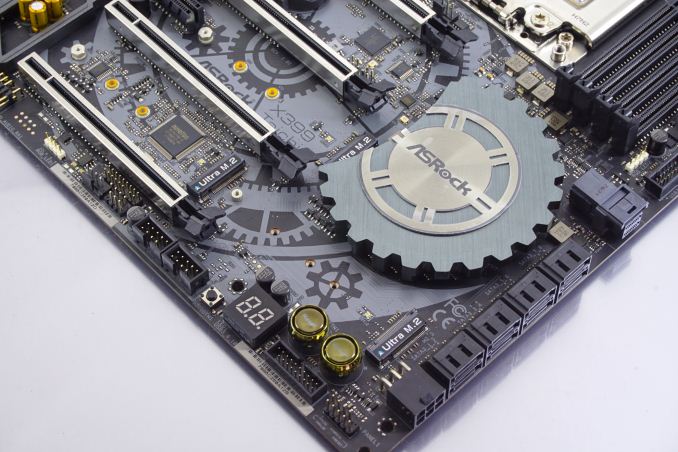
The ASRock X399 Taichi shares almost the same layout as the ASRock X399 Professional Gaming and, thus, the same design choices. Most of the internal headers are placed across the bottom edge of the motherboard. From left to right, there are two front panel audio headers, one standard and one vertical, a COM port header, a header for a 12V RGB strip, a standard 4-pin fan header, a TPM header, an extra power LED/system speaker header, two headers for USB 2.0 ports, a small CMOS reset switch, a debugging LCD, one USB 3.1 Gen 1 header, two gold-colored power/reset buttons, and the system switch/LED header.
Moving to the right side of the motherboard, we can see eight SATA connectors at the lower right side, followed by a U.2 PCIe ×4 connector. The ASRock X399 Taichi has three M.2 PCIe ×4 slots, one of which is sharing lanes with the U.2 connector. Installing a U.2 device will disable the first M.2 slot. There is no support for 110 mm M.2 devices as all three M.2 slots support drives up to 80 mm long. A second USB 3.1 Gen 1 header can be seen between the U.2 port and the ATX 24-pin power connector.
The major questionable design choices are two. The first is the use of a 6-pin PCIe connector on the lower right edge of the motherboard that serves as an additional power source. The use of an extra power connector is not strange on AMD X399 motherboards that support quad SLI but the choice of this particular connector is, as it would force users who want to use four graphics cards to use an adaptor on Molex connectors because almost all power supplies stop at eight PCIe connectors. The second is the placement of the CPU's power headers, which are split between the left and right top side of the motherboard. ASRock advertises this as an advantage, as it creates a wider trace for the CPU's VRMs. The concept is technically sound from an engineering point of view but it also could create compatibility problems because several PSUs have both CPU 12V connectors on a single cable, meaning that an extension would be necessary to reach the second connector on the motherboard. A thicker copper layer would certainly produce better results but, since ASRock is already using a 2oz copper PCB, a thicker copper layer would greatly increase the motherboard's manufacturing cost. Finally, the placement of two fan headers between the CPU's socket and the first PCIe slot, where they will be practically inaccessible after a CPU heatsink and a graphics card are installed, is another odd design choice, albeit a minor one.
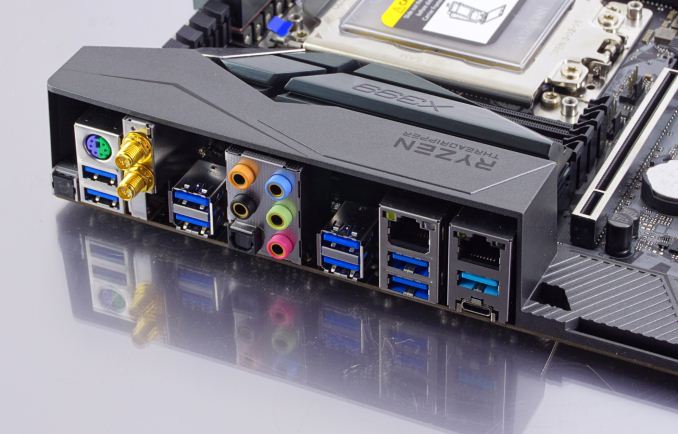
As with most newer motherboards, USB connectors dominate most of the rear panel of the ASRock X399 Taichi. There is a small button that can be used to initiate the BIOS "flashback" feature, allowing the user to flash a BIOS even if there is no CPU and/or RAM installed on the motherboard. From top to bottom, we can see two USB 3.1 Gen 1 connectors and a PS/2 combo connector, two wireless antenna connectors, two USB 3.1 Gen 1 connectors, five gold-plated 3.5 mm audio jacks and one optical SPDIF connector, four USB 3.1 Gen 1 connectors and the first I211-AT NIC, and, finally, the two USB 3.1 Gen 2 10 Gbps connectors (one Type-A and one Type-C) and the second I211-AT NIC.
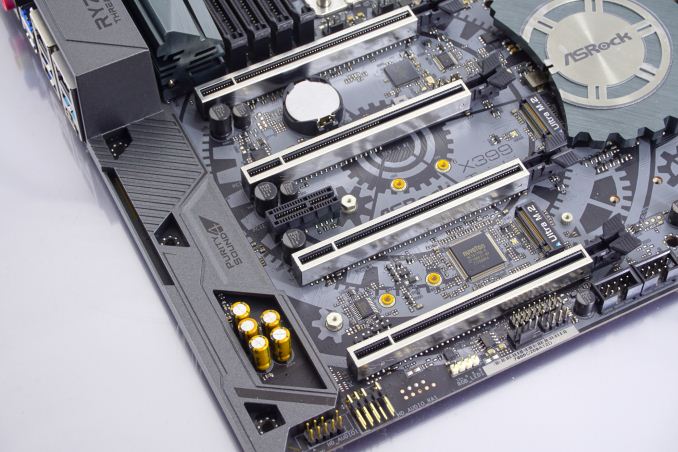
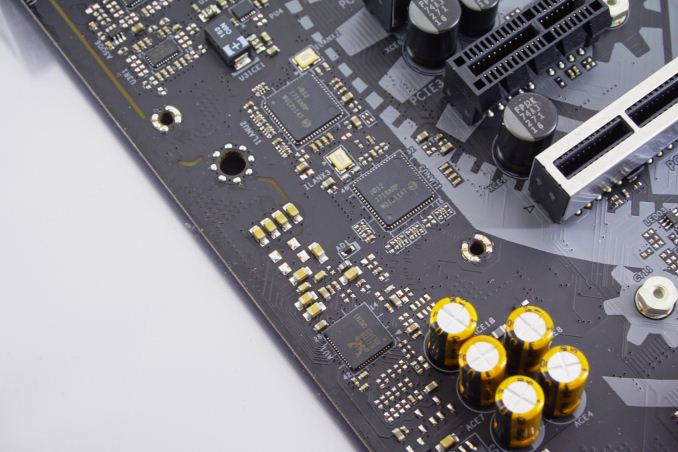
ASRock's engineers placed a significant amount of carefulness on the audio circuitry. The ASRock X399 Taichi is using the Realtek ALC 1220 codec, the same chip that every other AMD X399 motherboard is currently using at the time of this review. However, they physically isolated the left/right channels on individual layers, plus they isolated the audio circuitry from the rest of the motherboard. ASRock is using Nichicon's known audio-specific golden capacitors and also installed a Texas Instruments NE5532 amplifier for the headphones.
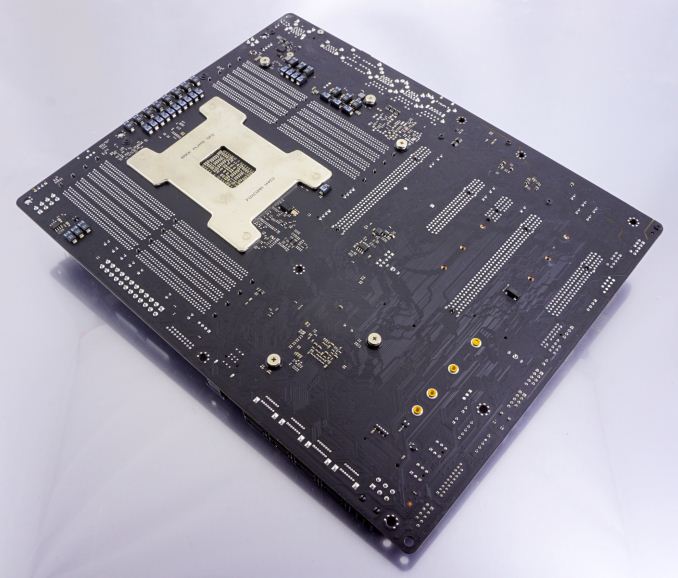
A quick glance at the back of the motherboard reveals that the X399 Taichi does not have any metal supports/braces, aesthetic or otherwise, beyond what the standard CPU socket offers. The standard CPU socket is adequate for even the heaviest CPU cooler but will not withstand severe mishandling.





29 Comments
View All Comments
The_Assimilator - Friday, October 26, 2018 - link
Board Features/"In The Box" claims that you get Crossfire bridges with this board, but that's not reflected in the picture, plus bridgeless Crossfire has been a thing for years.Pretty luxurious of Asrock to include a 4-way SLI bridge, though... even if SLI is dead with RTX.
GreenReaper - Sunday, October 28, 2018 - link
I think the points just go through the board and the attachment plugs can go on either side, Maybe to store them in transit, or to discourage use of that slot because it gets disabled by the U.2 connector?Maryjohn0192 - Saturday, October 27, 2018 - link
good oneAntonErtl - Saturday, October 27, 2018 - link
I would have liked to see some information about ECC support. Does the board support it officially? Does the Linux kernel report that ECC is enabled if you supply ECC memory (and not if not)?kobblestown - Monday, October 29, 2018 - link
It does support ECC officially - that's what it says on the site and in the user manual. I have access to a TR machine with Asrock X399 Professional Gaming which is the same board as the Taichi but with a 10G Ethernet chip. The machine is equipped with 4x16GB ECC@2400MHz/s modules from Kingston. There are several BIOS options that seem related to ECC but there's no description of these options in the manual. Anyway, the kernel seems to be aware of the ECC. Here's a snippet from dmesg:EDAC amd64: Node 0: DRAM ECC enabled.
EDAC amd64: F17h detected (node 0).
EDAC MC: UMC0 chip selects:
EDAC amd64: MC: 0: 0MB 1: 0MB
EDAC amd64: MC: 2: 16383MB 3: 16383MB
EDAC amd64: MC: 4: 0MB 5: 0MB
EDAC amd64: MC: 6: 0MB 7: 0MB
EDAC MC: UMC1 chip selects:
EDAC amd64: MC: 0: 0MB 1: 0MB
EDAC amd64: MC: 2: 16383MB 3: 16383MB
EDAC amd64: MC: 4: 0MB 5: 0MB
EDAC amd64: MC: 6: 0MB 7: 0MB
EDAC amd64: using x8 syndromes.
EDAC amd64: MCT channel count: 2
EDAC MC0: Giving out device to module amd64_edac controller F17h: DEV 0000:00:18.3 (INTERRUPT)
EDAC amd64: Node 1: DRAM ECC enabled.
EDAC amd64: F17h detected (node 1).
EDAC MC: UMC0 chip selects:
EDAC amd64: MC: 0: 0MB 1: 0MB
EDAC amd64: MC: 2: 16383MB 3: 16383MB
EDAC amd64: MC: 4: 0MB 5: 0MB
EDAC amd64: MC: 6: 0MB 7: 0MB
EDAC MC: UMC1 chip selects:
EDAC amd64: MC: 0: 0MB 1: 0MB
EDAC amd64: MC: 2: 16383MB 3: 16383MB
EDAC amd64: MC: 4: 0MB 5: 0MB
EDAC amd64: MC: 6: 0MB 7: 0MB
EDAC amd64: using x8 syndromes.
EDAC amd64: MCT channel count: 2
EDAC MC1: Giving out device to module amd64_edac controller F17h: DEV 0000:00:19.3 (INTERRUPT)
EDAC PCI0: Giving out device to module amd64_edac controller EDAC PCI controller: DEV 0000:00:18.0 (POLLED)
AMD64 EDAC driver v3.5.0
CyrIng - Sunday, October 28, 2018 - link
What about Linux and FreeBSD?Can we have a review of Threadripper motherboards with some Kernel build benchmark for example?
kobblestown - Monday, October 29, 2018 - link
If you are interested in running Linux on TR you should check phoronix.com - they have benchmarks that are much more varied than what they do here.There is something else to note though - the experience has not been flawless for me. I snatched a 1920X at the time the 2990WX was announced a couple of months back for a great price that is no longer available and married it to an Asrock Fatal1ty X399 Professional Gaming with 4x8GB G.Skill 15-15-15-sth@3000MHz (not the machine from my post above). First of all, it takes ages to boot. That seem to be common for TR builds and is a bit annoying. But what annoys me the most is that the BIOS resets all settings every time you plug, unplug or change any PCIe/NVME device (not sure about the SATA since I rely on NVME entirely). The best approach is to save your settings (there are several save slots) and recall from there. Otherwise it's too much trouble because there are tons of options and most are not documented anywhere. I'm not even talking about overclocking - the machine is a beast even at stock freqs.
Also, you'd want to make sure that you run the latest BIOS/AGESA - for example the one the board came with did not allow for 3000MHz - only 2933 and 3066 (among others). The latest AGESA fixed this and my G.Skill which not validated for Ryzen works just fine. However, this latest version has some problem with the latest Linux kernels - for instance I couldn't run the Ubuntu 18.10 installer because of this kernel problem that can only be solved with custom compiled kernel (i.e. not with a boot option IIRC). OTOH, 18.04 runs just fine. I want to experiment with VGA passthrough and I have the hardware but haven't got the time yet. One thing to note is that all four network adapters (2x1G + 10G + WiFi) are in the same IOMMU group. It would have been nice to have the wired adapters in separate groups so I can assign them to different VMs but I think virtio-net will not break too much sweat on such a powerful machine.
CyrIng - Monday, October 29, 2018 - link
Thanks a lot for sharing this Linux experience.Phoenix is indeed a good Foss source but less hardware gifted as Anandtech.
As a System programmer, I would enjoy too see benchmarks dealing with Buildroot, FS squashing, cryptography support, big project compilation time and so on
Buying such hardware for a total of 1=3 $K claims à lot of details...
Regards
cyberguyz - Wednesday, October 31, 2018 - link
I have one of them. It works ok. Has problems running my GSkill TridentZ 3200 CL14 memory at XMP speeds without boosting memory voltage to 1.45v. Also it is a pain in the a$$ when it comes time to try out different settings since the only way to reset cmos is to open the system up and push a tiny little easy to miss button hear the onboard reset & power buttons. An external button like many of the competitors use would have been a real relief from that hassle.